|
Inversion concepts:
|
Contents and objectivesIn this section, fundamental concepts are implemented for a synthetic 2D DC resistivity data set. Treatment is not rigorous because the purpose is to illustrate how inversion is applied, and what the effects of various decisions will be on the model recovered by inversion. This page is challenging at this level. It assumes some understanding of DC resistivity surveying, and some experience with geophysical data. However, it does illustrate what's involved in carrying out inversion work. If you are reading this from the IAG cd-rom, there is a slightly more advanced version of this page at the end of Chapter 4 "Inversion Theory". If Chapter 4 is to be covered, you might gain more by deferring this page until then. Question set A (close)
Question set B (close)
Question set C: For those with field experience: (close)
Question set D: (close)
Question set E: (close)
Question set F: (close)
What can you safely say now about the targets?
Question set G: (close)
Question set H: (close)
1. Introducing the scenarioTo illustrate the work involved in carrying out inversion, we will use a synthetic DC resistivity survey and the UBC-GIF's forward modeling & inversion program library called DCIP2D. The artificial 2D electrical conductivity structure of the Earth that is used to generate the data will be revealed later, but for now we will start with the data set and work through an inversion sequence as if we were doing a normal job. Generic flow chart icons are included to help remind you of where in the inversion methodology we are currently working. There are occasional
|
 The mesh used to define a discretized 2D model under the survey line. The survey extended from 0m to 200m. Zones outside this region are "Padding", explained in the text. Mouseover illustrates. |
Larger cells are used around the main region of interest to allow for mathematically smooth transitions towards the edges of the domain. Without this buffer (or "padding") zone, it would be impossible to obtain sensible values for the region of interest. Larger cells are acceptible since this zone of the model will not be interpreted.
Topography must be approximated using rectangular cells. When a "default" mesh is used with UBC-GIF codes, the program builds a discretized 2D Earth with cells in the zone under the electrodes that are 0.5S in width and 0.25S in depth (where S is minimum electrode spacing). Outside this region, cells are added with increasing size towards the periphery.
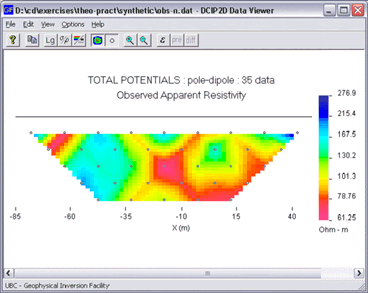
The first task is to inspect the data set itself in order to gain first impressions and to ensure that sensible errors are applied. For some hints on familiarization with the data, click the questions button to the right.
 |
<== Left: The graphical user interface for DCIP2D. |
When first examining a DC resistivity data several questions should be considered. The two main objectives are to gain some appreciation for what is likely to be in the ground prior to carrying out the inversion. Click the question button for some suggestions of applicable things to think about.
![]() We need to judge the reliability of the data set, and to specify standard deviations for the data accordingly. Making this judgement requires some knowlege about the acquisition of data in the field, and for the likelihood that there were problems or external sources of noise.
We need to judge the reliability of the data set, and to specify standard deviations for the data accordingly. Making this judgement requires some knowlege about the acquisition of data in the field, and for the likelihood that there were problems or external sources of noise.
True statistical estimates of error from the field can only be obtained if many versions of the data set were obtain. Since this is almost never done, it is common to assume there are random Gaussian errors, and standard deviations for each datum can be applied using both a percentage of the datum and a minimum value, or offest. For the data set used in our synthetic example, the added noise is a random Gaussian value based upon 5% of each datum plus a 0.001 Volt minimum.

Pseudosection display in DCIP2D, with the properties dialogue for a single datum.
If you have some field experience, some questions you might like to consider regarding errors are in Question Set C. Errors can also be adjusted for individual data points if you suspect any datum is particularly noisy. For example, it is not uncommon for all data values recorded at one electrode location to have additional noise, due for example to a poor electrical contact, a nearby metallic fence, or other reasons. Specifics for every datum can be examinied in the data display program by clicking on any data point (see the previous figure).
A so-called model objective function is used to define the type of "optimum" model the inversion algorithm is looking for. This function is a way of quantifying desirable features of a physical property model. The inversion chooses an optimal model by searching for a model which will minimize this function subject to the constraint that the chosen model can generate predicted data that satisfy the misfit criteria. The model objective function is
,
and it is defined using two components coloured blue and pink above:
In fact, the significance of each component is controlled using the "Alpha" coefficients ![]() s,
s, ![]() x, and
x, and ![]() z in the equation above. Therefore the user can request a model that emphasizes either component 1 or component 2.
z in the equation above. Therefore the user can request a model that emphasizes either component 1 or component 2.
Default values of these coefficients are determined by the program based upon the length scales of the survey and mesh. The inversion's task is to find a model that minimizes this relation; the result will be an optimal model.
For the program DCIP2D, the default specifications for these "Alpha" parameters have been found to work well as a first attempt, but experimentation and adjustment of the parameters defining the desired model type is expected during the course of inversion processing. This will be discussed in the "Alternative models" section below.
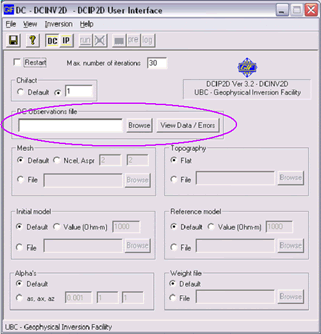
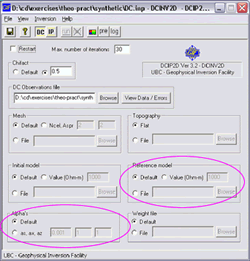
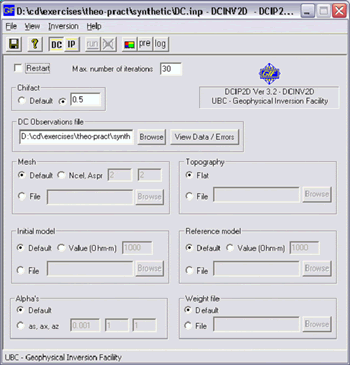
The first inversion should be run only after learning as much as possible from the raw data, including how to set errors properly. The DCIP2D user interface has defaults for all parameters except the input file name.
If our synthetic data set has errors assigned using 5% + 0.001V minimum, then running the first inversion with all default parameters will produce a reasonable initial solution.
A sidebar shows |
The GUI after completing the inversion is shown in the next figure. Point your mouse to either model ![]() , pre
, pre![]() , or log
, or log![]() buttons to display an image of the corresponding user-interface window for the inversion that was just completed.
buttons to display an image of the corresponding user-interface window for the inversion that was just completed.
|
See text for notes on images obtained by pointing to either of the |
How should you examine these results to determine if the inversion was successful at returning a reasonable model? There are five aspects to observe and consider:
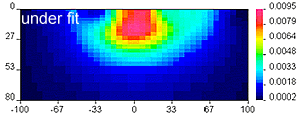
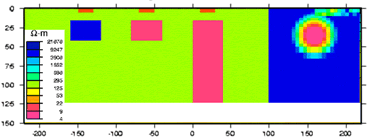
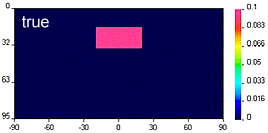 Geologically reasonable? It is important to decide whether the resulting model is geologically reasonable. This final consideration is more subjective. A simple example is shown here, in which data produced by calculating data over the "true" 2D model (top right) are inverted twice to produce two inversion results which are both inadequate. The image labelled "underfit" is a model recovered when the target misfit was too large. The program has stopped looking for details when predictions look only somewhat like observations. The image labelled "overfit" is a model recovered when the program has tried too hard to find details that explain every nuance in the observations.
 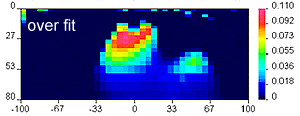 |
 |
![]() Your first inversion rarely produces an optimal result. More inversions must be run to obtain alternate models. Alternate models are obtained by changing either the model norm or the target misfit (both terms were defined in the previous section). Changing the model norm can be done in two ways: a "reference model" can be adjusted, or the degree of smoothness can be adjusted. See the last part of "Feasible model norms" in the "Norms and misfit" section of this chapter.
Your first inversion rarely produces an optimal result. More inversions must be run to obtain alternate models. Alternate models are obtained by changing either the model norm or the target misfit (both terms were defined in the previous section). Changing the model norm can be done in two ways: a "reference model" can be adjusted, or the degree of smoothness can be adjusted. See the last part of "Feasible model norms" in the "Norms and misfit" section of this chapter.
First you should identify what values the program set for its default run (see question set D above), and then you should adjust one of these to obtain a second result.
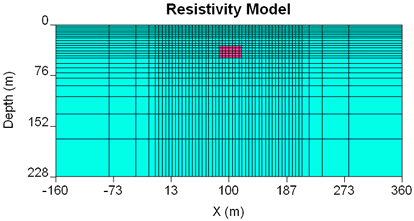
Here we will start by specifying a different reference model. One with a value similar to the first model's lowest conductivities is a good choice.
Upon completion there will be a second model can be compared with the first, default model. These are both shown in the figure below. Typical questions to consider are given in question set E.
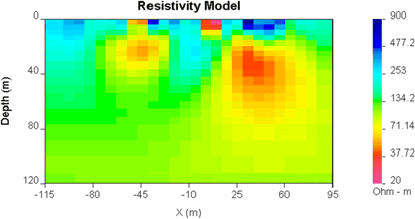
| Resistivity model using default reference model.  |
Resistivity model using reference model of 1000 Ohm-m.
 |
Models produced by inversion of DC resistivity data appear to fade with depth, but how can we gain a more quantitative understanding about which regions of the model are reliably constrained by our measurements? If there are at least two reasonable models obtained using different reference models, the two models can be compared to identify which regions of the model most significantly affect the measurements. Results of doing this are explained next.
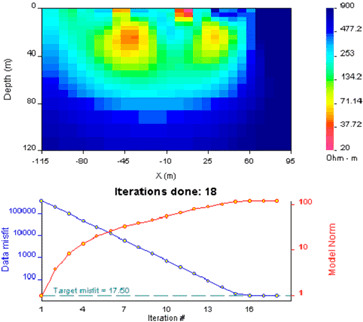
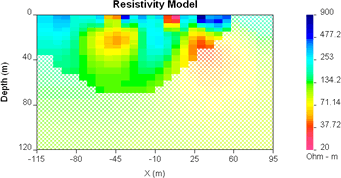
Using the DCIP2D program, the method is applied within the model viewing window, using "Depth of investigation" option in the "Options" menu. There must be a second model that was recovered using the same mesh as the one being observed. Results for our synthetic model can be seen as soon as the two inversions described above have been done. Any two different inversions results can be used. Four versions are shown here, and typical questions that should be considered with such results are given in question set F.
|
Evidently, all versions will be interpreted similarly. The left buried conductor appears to be small with more resistive material beneath approximately 40m depth. However the stronger buried conductor to the right does not have a bottom that has been imaged by this survey. DC current tends to accumulate in conducting regions so investigation depths in conductive ground tend to be shallower. |
 |
When geophysical models created by this inversion methodology are used to make geological interpretations, it is a crucial that more than one model should be used. The reason is that with any single model, many questions can be posed. Only by comparing several results can you begin to gain reliable answers to these questions. For example:
There are three main approaches to finding alternate models, and these are outlined next.
Our second inversion done above involved specifying an alternative reference model. This is a powerful tool for exploring which regions of the model are reliably defined by the data. This point is emphasized in the interactive figure below, which shows five models recovered for a new, synthetic model, which is somewhat more complex than the small example we have been using. All recovered models (2. through 6.) are equally valid because they can each reproduce the data to within the specified misfit, but they are different because of the specific reference model used for each.
 |
Recall that the way in which a model is "measured" in order to distinguish between different models involves an equation with two parts. As noted above, this equation has one part which measures how close the resulting model (m) is to a reference (m0) (blue part), and a second part that measures how smooth the model is (pink part). In fact, the smoothness in the horizontal and vertical directions are measured separately so the second part of our norm contains two components.
The UBC-GIF inversion routines make the reference model, m0, and the three ![]() 's available for adjustment. What is the effect of adjusting these
's available for adjustment. What is the effect of adjusting these ![]() coefficients? Recall that this function will be minimized. If one of the
coefficients? Recall that this function will be minimized. If one of the ![]() 's is very small, then the corresponding term will contribute little to this minimization. So, reducing the size of
's is very small, then the corresponding term will contribute little to this minimization. So, reducing the size of ![]() s will result in smoothness in the X- and Z-directions in favour of closeness to the reference. Reducing the size of
s will result in smoothness in the X- and Z-directions in favour of closeness to the reference. Reducing the size of ![]() X or
X or ![]() Z will result in models that are preferentially smooth in the X- or Z-directions respectively. Images below illustrate the effect of different choices for values of the three
Z will result in models that are preferentially smooth in the X- or Z-directions respectively. Images below illustrate the effect of different choices for values of the three ![]() 's .
's .
| Click buttons to see models resulting when the three Are all models equally capable of reproducing the data? Yes, predicted data for all results are very similar. You can try this yourself, and consider the questions in question set G. |
 |
What about the actual values to specify for the ![]() parameters? This is beyond the scope of this page.
parameters? This is beyond the scope of this page.
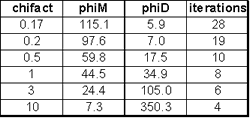
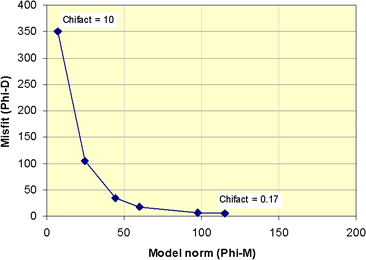
Finally, what is the effect of adjusting the target misfit value to numbers other than N, the number of data? An initial comment was made above, but you can explore the consequences of adjusting the misfit by changing the Chifact parameter.
In fact, it is instructive to generate models for a range of values, and use the resulting values of model norm and misfit to generate curve which plots these values for several trials.
The results of inverting our example using several different values for Chifact are summarized in the following table and corresponding curve. Some questions to consider are in question set H.
| Table of values resulting from inversion using five values of Chifact.
|
 |
| Click to see models recovered using each value of Chifact. |  |
After working through this page, some relevant closing remarks are: